
Okay, you’re subscribed to Spotify Premium, but it’s not working out. It’s not you, it’s them. Time to go your separate ways.
So I too decided I wanted to cancel Spotify Premium. The process was such a joy to behold, that I thought I might share it with others.
Let’s bear in mind here that I’m not always the sharpest sandwich in the sky, so working this out took me a while. But work it out I did. And because Spotify is a stage 5 clinger, it’s my public service to assist you in the process.
Firstly, lets define the difference between cancelling Spotify Premium, and deleting your Spotify account. Cancelling the Premium service will return you to Spotify’s free service, and will not delete your account. This is a separate process.
If you’re trying to delete your Spotify account completely, you’ll need to wait until your subscription to Premium has expired. You can only delete a Spotify account when you’re using their free service, and not an active Premium service.
If you are already on a Free account, please read my other article on how to delete your Spotify account completely. If you are not, read on.
I did not find it particularly obvious how to cancel Spotify Premium. This is because I was hunting for a ‘delete’ button. There is no delete button. That’s because I didn’t know about the two-pronged approach to leaving Spotify when you’re a Premium customer. I needed to be looking for an unsubscribe/change button. You can’t just leave whenever you want. That would be madness.
When I signed up, I subscribed to their $0.99 for 3 months deal, and didn’t realise that this committed me to 3 months of Premium service even if I hated it and wanted to delete it the next day. I’d already swiped the credit card, I’d already handed them my soul for three months.
I could cancel Spotify Premium straight away, but all this means in my case is that after the 3 months period eventually expires I won’t be charged anymore and will be automatically switched back to the free service.
But unfortunately, it means I can’t delete my account for another 3 months, or cancel the next 3 months of debits to my credit card. Presumably this is because they hope I’ll make use of those 3 months and love the service so much I’ll sign on again for more Premium. Or maybe I’ll just find the process of deleting my account so annoying that I’ll give up trying to get out of it and stay a customer. Even a non-paying customer is worth something.
Something to keep in mind when signing up for stuff in the future. Read the Ts and Cs I suppose! This is where an app like TrackMySubs is going to be awesome though. I guarantee you I will not remember that rollover date and will forget to delete my account. But I can set up an alert with TrackMySubs to notify me when my Premium service is up and I can delete that account, huzzah!
But we can deal with deleting the account later, firstly let’s cancel Spotify Premium!
Step 1
Go to Spotify and log in to your account.
When you are logged in you will see your username in the top right corner, and your Account Overview below.
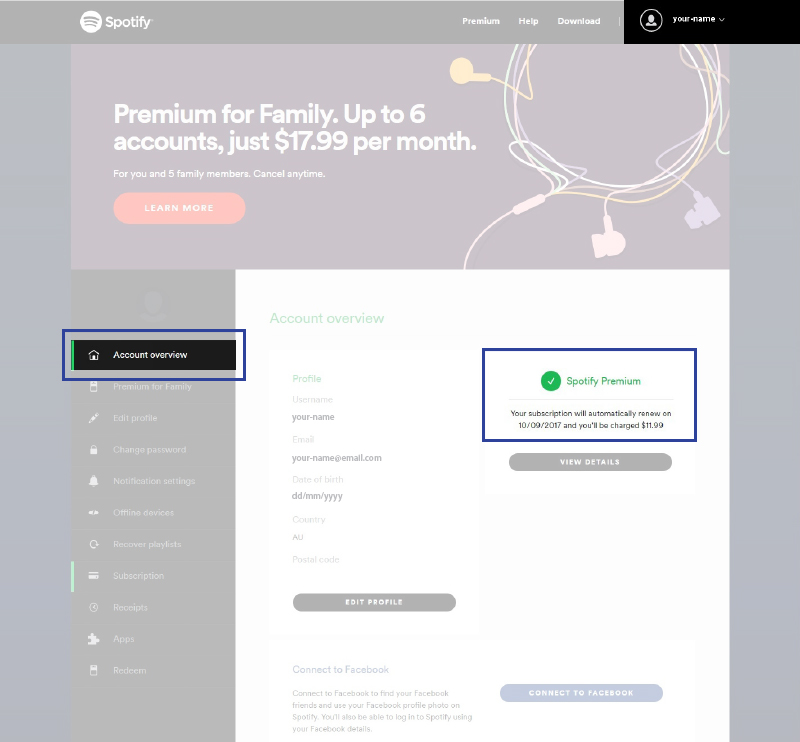
You’ll see to the right-hand side it will show your subscription to Spotify Premium highlighted in green with the big tick. As mentioned, I am currently subscribed to their $0.99 for three months deal, and it is due to roll over after the 3 months to the full Premium price.
So as we know, I can’t delete the account. So for now I’ll just unsubscribe so that after the three month deal has expired I am just returned to their free service and will NOT automatically be rolled over to the higher price.
Step 2
You’ll notice in the left-hand side menu will be the option, ‘Subscription’. Click it.
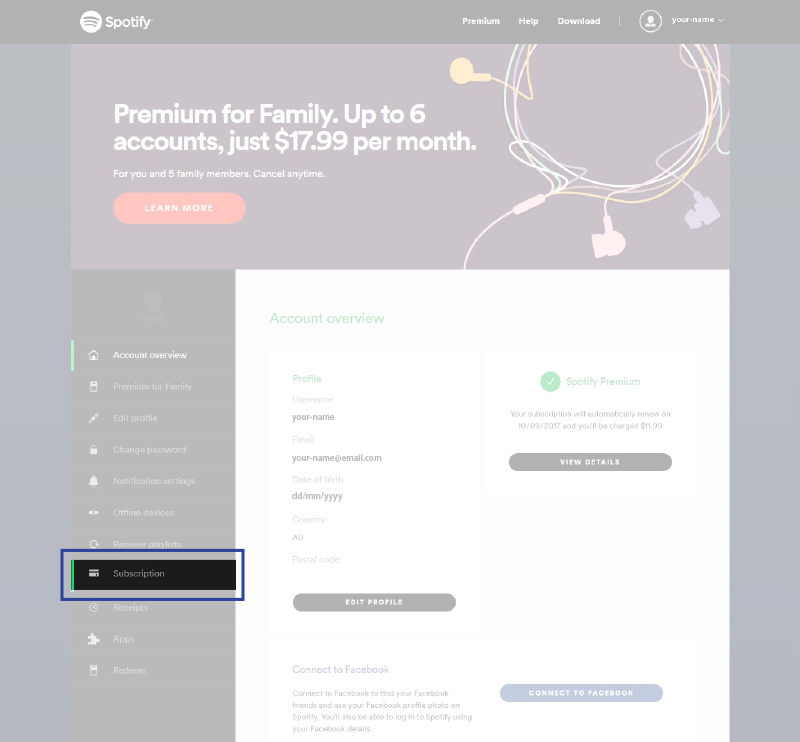
This will take you to your subscriptions page. Again it’s showing my subscription to Spotify Premium.
Step 3
Select the black button beneath the subscription info showing the option ‘Change or Cancel’.
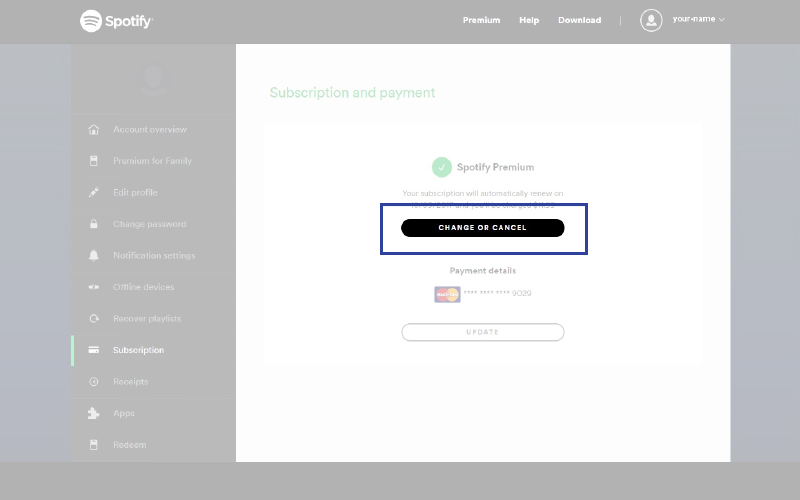
This will bring you to your Change or Cancel page. As you wish to cancel your Premium subscription, you’ll need to change to Spotify Free.
Step 4
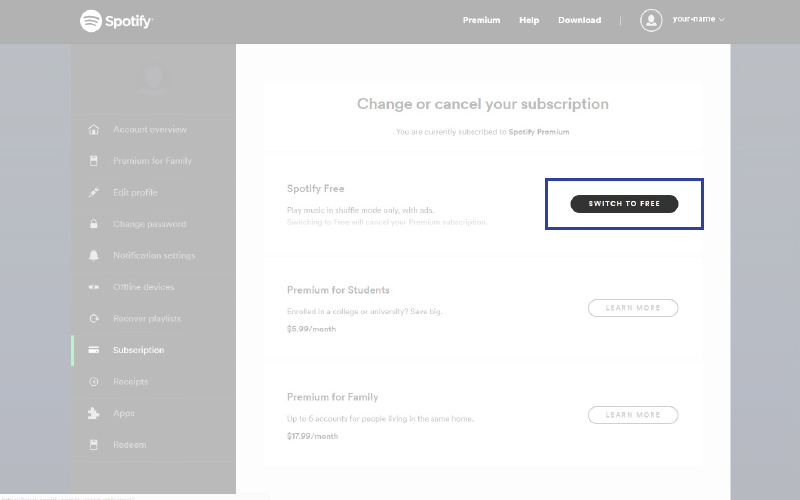
Select the ‘Switch To Free’ button.
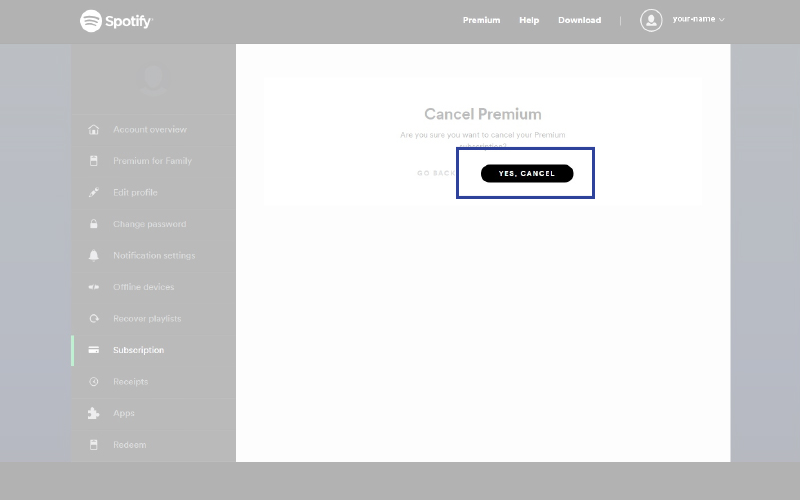
Step 5
It will then confirm that you wish to cancel the Premium service. Select ‘Yes, Cancel’.
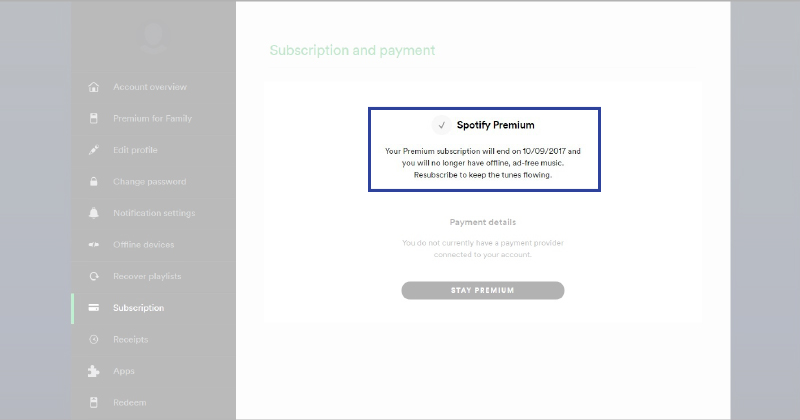
It will now show and confirm that you’ve cancelled your Premium service, and beneath show you the date your subscription will end and return to the free service.
You do have the option to fill out the questionnaire below, should you want to advise Spotify for your reason for unsubscribing. However, by the time I made it to this point my patience for questionnaires was at an all-time low.
Also, this is a good time to keep note of that subscription end date as you’ll want to make sure your credit card is no longer being debited after that date has lapsed. Not to mention you can now go on to delete your account if you want. Don’t forget to set up your reminder alerts in TrackMySubs!
Step 6
If you now go back to the ‘Subscription’ option on the left side menu, you’ll be able to see it shows your end subscription date now, instead of a rollover date. It’s worth checking this before you log off, just to make sure your request to cancel has been processed correctly.
Now, if your subscription to Premium has expired, you can read my article on how to delete your Spotify account completely.
So whether it be this particular deal or just a regular Spotify Premium subscription, you’ll need to keep track of this rollover date in case you wish to delete your account or resubscribe at any point in the future. If you don’t unsubscribe before you reach this date, you’ll continue to be charged every month whether you want to be or not.
Sign up to TrackMySubs so you can keep track of all your subscription rollover dates, debit dates, and free trials. Don’t pay for subs you don’t want, and never miss a payment for the ones you love!
No Comments yet!